Showing posts with label Home Decor. Show all posts

Pretty In Pink Decorative Box

It seems that a staple product in plastic canvas work is the infamous "trinket box". A decorative box that can be used to store various items such as jewelry, potpourri... or anything your heart desires, as long as it fits. 

Pink Beaded Decorative Box

This pink beaded box is one of my favorite pieces. Maybe because it's such a girly piece, and I am a girl after all. My girly-girl teenage daughter doesn't think I should sell it. She has hinted to me that I should just give it to her!

Princess Pink (as I call it) acrylic yarn was sewn into cut sheets of plastic canvas, in a checkerboard pattern. Each small square is sewn in the opposite direction to the one before it. When the light hits it just right, it plays a little trick on the eye, and almost appears to be two different shades of pink! I didn't even realize that the light thing would happen. I just wanted a more interesting pattern, and the happy little discovery occurred. 

The lid was sewn in the same pattern, but made just slightly larger so that it overlaps, but fits snugly on the box.

sparkly glass beads

Once all of the pieces were assembled, I hand stitched pink glass beads around the the entire bottom, and outlined several squares on the sides and the top of the lid. The pink beads themselves have a silver inner lining, so they really are quite sparkly.

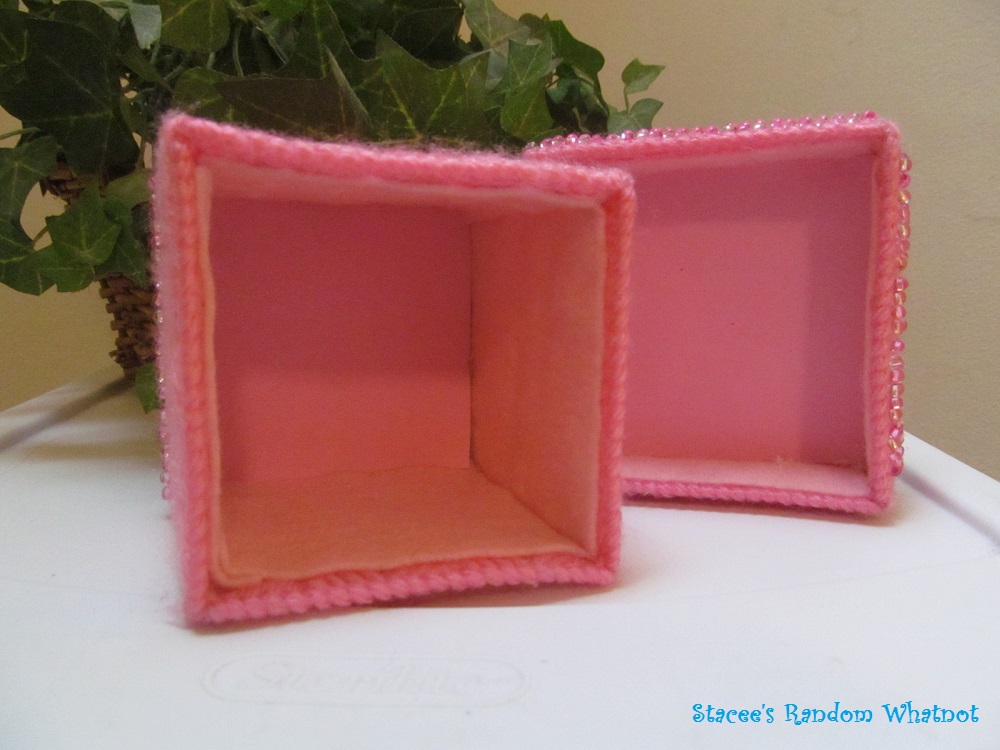
pink felt and craft foam lining

Finally, pink felt was glued all around the inside of the box and the lid, to hide the stitching and create a more finished look. And a piece of pink craft foam was inserted to snugly fit the bottom and top of the lid.

"Sshhh, don't tell her she's a jewelry box. She thinks she's a princess".

Click this link the view this piece in my shop!


Blue Mosaic Decoupage Glass Vase


I don't know what had gotten into me that year, but after making the Victorian Vase using the decoupage technique, I became entranced with paper projects. I loved the way paper could look like tile or glass.

I found that the translucent vellum paper lends itself well to the stained glass look, as you've seen with my Moon & Stars Tealight Candle Holder. But solid colors and patterns could be mixed together to create something very unique. The color and pattern combinations would be endless!

Do you know what else is endless?
-The time it takes to get all of the glue off of my fingers.
-The time I spend vacuuming, or down on the ground picking up all of the bits of paper that I drop.
-And the sheer time it takes to complete one project.

But I must say that I was pretty darn proud of myself when I created this blue vase. Starting it's life as a plain clear glass vase, the kind you get with a delivered arrangement. There are about five thousand of them at your local thrift shop right now, I guarantee it. 

It got a bath and a good exfoliating scrub (I scratched up the glass a little bit with sandpaper to make sure that the paint would have something to fully adhere to). That was a step I have since eliminated, because if you use the proper primer, it sticks just fine.

A coat of white spray paint went on first, because that's all I had. But looking back, the white was exactly what it needed. The paint was sealed with acrylic before starting the decoupage. Again, an unnecessary step that I have since deleted, since the entire piece would be sealed when complete.

I then spent two weeks painstakingly cutting and gluing each geometric shape to the surface. Arranging them just so. Then I sealed it all again, and again. 

It is a beautiful vase for fresh cut stems, but I think it makes a nice statement piece all by itself. Perhaps some dried flowers in a color that accentuates the blue would be nice as well.


My First Candle Holder


The Moon & Stars Candle Glass


One of my favorite creations is this Tealight Candle Holder. I loved it so much when it was finished that I decided not to sell it and kept it for myself! I'm certain that one day I'll make another one specifically for my Etsy store. Someday

It started it's life as a plain and simple glass from the candle aisle of the craft store, but they're also sold in just about any retail outlet, you can often find them at the thrift shop and the dollar store. 

I cut small geometric shapes from various colors of vellum scrapbook paper. Vellum is awesome! It's translucent, so it lets light from a candle glow through the color.

I used a bright yellow for the moon and stars. Then surrounded them with a very pale blue. Everything else was covered in dark navy blue. The paper was glued on with Mod Podge. When it was complete, I brushed the entire thing with another coat of Mod Podge. Finally, it was sealed with an acrylic finish.

It very much resembles stained glass, and that was my intention. This was my very first paper mosaic project, made right after my first experiment with decoupage, the Victorian Vase.

My First Victorian Decoupage Vase


I had never done decoupage before, and this was my first ever attempt. It might be a little difficult to really see the detail, but I'm sure you get the idea.

It started off as a clear glass vase. The kind you get when someone sends you an FTD arrangement. In fact, I think that's exactly how I got this one, and if I hadn't found some way to decorate it, it would've ended up at the Goodwill store. That's where I get my vases now. There are a million of them at the Goodwill store!

It was a spur of the moment idea. One of those ideas that I get when I'm in the hypo-manic phase of my Bipolar cycle. (I get a million ideas, and I need to do them all, and right now!). 

I didn't have patterned papers, so I searched the internet for free printable Victorian style scrapbook papers. This method will use up a lot of printer ink, but if you're ever in a pinch for just the right paper, it's an option. I also printed pictures of "Victorian ladies", and "antique time pieces". 

On a notepad file in my computer, I typed out a few lines from a favorite old poem and printed it in a fancy french script font. When I had all that I needed, I "aged" a few of the photos by brushing them lightly with a strong black tea, and let them air dry.

I ripped all of the papers into smaller pieces. Ripped edges have so much more character than those that are precisely cut by scissors. Ripped edges are for layered decoupage, cut edges are for mosaics.

Each torn piece was slightly layered over the previous one, and brushed over with Mod Podge glue. When the entire piece was covered, I traced over some of the torn edges with a gold metallic craft paint. It added dimension and depth. I also used the gold paint to stamp the word "love" (which was written in script) onto one side.

At the end, I brushed the whole vase with two coats of a clear acrylic finish, topped it off with a sheer pink ribbon around the neck, and piece of pink felt glued to the bottom.

I had intended to sell it right from the start, but when I set it on my own shelf, it instantly became mine. It looks so nice arranged among a couple of black wrought iron candle holders, a ceramic green milk pitcher, and a wooden mortar and pestle set. It was so very... Victorian.